
3D Printing on Fabric: Inspirations and Experiments
- Celeste
- Sep 7, 2019
- 4 min read
Updated: Apr 9, 2023
3D printing and fabric are two materials that I had never considered combining until I saw this tutorial from Make Magazine. 3D printed objects are rigid and usually inflexible, you have to have a 3D printer and CAD software to create your own 3D prints. Fabric is soft and flexible, you only need to be familiar with a needle and thread or a sewing machine to work with it. Maybe it’s the contrast between these materials and methods that I think is so engaging.

If you haven’t yet been exposed to the magic that is 3D printing + textiles here is one of my favorite examples: Dutch fashion designer Iris Van Herpen has become well known for her incredible garments, some of which are entirely 3D printed and some of which incorporate 3D printed pieces. She has an interesting philosophy on her use of 3D printing:
"People think that everything I make is 3-D printed, but the basis of my work is really craftsmanship. I think a lot of people try to separate the two. You have traditional houses that focus on craftsmanship, and then you have people who are into technology, but I don’t really see that they have to be apart. I see them as equal, and I actually think that they can complement each other. Sometimes a texture that I’ve been developing on a 3-D printer can be an inspiration for a handwork technique, and sometimes it’s the other way around" - Iris Van Herpen, Vogue 2016

Here's another source of inspiration by Shorey Designs: Interchangeable 3D printed pieces that you can snap on and off of a piece of fabric augmented with 3D printed snaps.
Using the tutorial that I mentioned at the beginning of the post I began my own experiments with 3D printing and fabric. I started off simple, printing this file that I found on thingiverse so I could familiarize myself with the process. The process was surprisingly easy:
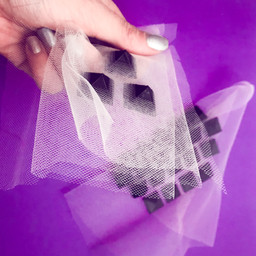
It’s best to use a fabric like tulle or lace that has holes in it because you’re basically sandwiching the fabric in between layers of your 3D print and if there’s no holes in the fabric then the plastic layers won’t stick together and you’ll end up with pieces of plastic that aren’t stuck to anything. I used tulle for my experiments. (side note: this tutorial does a really great job of explaining other materials you can print on and how to prepare fabrics that aren’t porous for 3D printing by laser cutting your own holes)
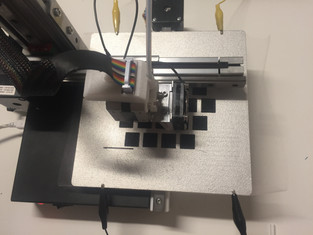
I sent my 3D printing file to my printer and began the print.I let it print 3 layers and then paused the print. In the software for my 3D printer it tells me what layer I’m on so I can easily tell when it’s time to pause. In some software like Cura you can tell your printer to pause after it’s printed a couple of layers.
Next I used some clips to secure the fabric on top of the layers that had been printed. I used alligator clips because that’s what I had on hand but I would recommend using clothespins or clips that you might use in the kitchen so that you don’t scratch your build plate or tear the fabric and so that there’s no wires in the way. After the fabric was secure I resumed the print and let it finish.


Next, I tried printing the same file but I paused the print multiple times and folded the fabric over the print, embedding multiple layers of the fabric into the print. The end result had a really nice effect that reminds me of mountains peeking out through fog and clouds or something submerged in water.


Finally, I wanted to try printing something that I designed myself. I was inspired by this origami lantern project that was 3D printed on paper. I love how the 3D printed pieces were an important part of the structure of the lantern. I found a tessellated origami pattern that I thought was interesting on a website app called origami simulator.
I took this pattern into Illustrator and created a vector based off the pattern. Then I exported it as an SVG and uploaded it to Tinkercad where I was able to quickly extrude the shape and give it a few millimeters of height and then export it as an .stl file for 3D printing.


I tried printing this on paper first (tracing paper to be specific) but I forgot that the material needed to be porous so the print completely failed to stick to the paper.
Printing the model on fabric was much more successful even though the fabric was too soft to hold a shape like the origami lantern.


The last experiment I tried was a a random idea that popped up as I was waiting for the origami print to finish. I wanted to create a 3D printed structure that you could embed in fabric and adjust to change the shape of the fabric. I quickly created a model in tinkercad (my go-to for quick and easy, lightweight modeling) and printed it using the same process of printing, pausing the print and attaching the fabric, and then resuming the print. But this time I repeated the print multiple times down a length of fabric. The idea is that you can shape the fabric by hooking the hook end of the print onto any of the triangular shapes along the length of the print.


I think I could continue these experiments for weeks! But I gave myself a strict deadline of one week so this is it for 3D Printing + Fabric experiments for now.
If you have any favorite examples of 3D printing + fabric let me know. I'm planning another round of experiments soon and I'm always looking for new inspiration.